Tuesday, December 30, 2008

Healthier Hummus

I hope everyone is having a wonderful holiday season! We were out of town for a bit, but am back now and I'm determined to finish all the Thanksgiving posts. There are about 3 more or so after this.

Another appetizer that we made for Thanksgiving was hummus. I love hummus and its great for entertaining as well as just keeping around the house as a healthy snack. Especially if its served with carrot and celery sticks instead of pita bread or chips.

A trick that I learned a long time ago from Martha Stewart is to replace the olive oil with chicken stock. That makes it even more healthy!

Ingredients:

  • 1 can of garbanzo beans
  • 1 tablespoon of tahini (to taste)
  • 1-2 cloves of garlic (to taste)
  • juice from 1/2 of a lemon (to taste)
  • 1/4 cup of chicken stock, olive oil, the liquid from the garbanzo beans, or a combo of all.
  • salt to taste
Method:
  • Drain the garbanzo beans and reserve the liquid if desired.
  • Pour the beans into a food processor.
  • If desired, add a clove or two of garlic.
  • If desired, add some lemon juice, to taste. I used about about half a lemon.
  • If desired, add some tahini, I used about a tablespoon.
  • Turn on the food processor while slowly drizzling in the chicken stock, olive oil or liquid from the beans or a combo of any of the three until the desired consistency is reached. You may have to stop the processor and scrape down the sides during this process.
  • Add salt to taste.
  • Serve with anything from pita bread, to chips, to carrot and celery sticks.
You can sprinkle a bit of paprika or herbs on top for color and flavor too.

Monday, December 15, 2008

Award Winning Bacon Wrapped Dates


Can you believe these little guys have won an award?

Well, not these exact guys, but a variation of them that I made last year. We have some friends who have an annual Iron Chef potluck where you are told a secret ingredient about a week ahead of time and then everyone brings potluck dishes to share and vote on by secret ballot. We got to participate in this fun event last year and the secret ingredient was liqueur.

Normally, I either stuff my bacon wrapped dates with goat cheese or with an almond. Since the secret ingredient was liqueur, I decided to infuse the goat cheese with amaretto! Great idea, right? It tasted great and we won the prize for most creative dish and was up there in the running for best appetizer too!

But since Thanksgiving didn't require me to use liqueur and I was being lazy, I didn't stuff the dates at all. The hubby said that without the cheese, the dates were too overpowering, so next time I won't leave out the cheese.

Ingredients:
- Pitted dates
- Bacon
- Goat cheese

Method:
- Split the dates and stuff them with goat cheese.
- Microwave the bacon for about a minute to render out some of the excess fat.
- Cut the bacon pieces in half (unless you have huge dates) and wrap each of the dates in the bacon.
- Place the bacon wrapped dates seam side down on a baking sheet (I used a silpat to make clean up a bit easier). If you have trouble keeping the bacon from unraveling, stick a toothpick through them.
- Put them into a 350 degree and cook until the bacon is nice and crispy. I think it took about 30 minutes though I wasn't really paying attention =P

Wednesday, December 10, 2008

Cheesy Biscuits

We love Red Lobster's cheddar bay biscuits. You just can't beat the buttery goodness of those biscuits, but it didn't stop me from trying!

Most Red Lobster cheddar bay biscuit knockoff recipes I found called for Bisquick. I didn't have Bisquick and didn't feel like buying it just for this recipe, so I used Paula Deen's biscuit recipe and added the cheese, etc, because I figured, if anyone knew how to make a buttery biscuit, it'd be her. Surprisingly, I still feel that Red Lobster's are even more buttery! Man, I don't even want to know how bad for me they are!

Inspired by Paula Deen and Red Lobster
Ingredients:

  • 2 cups all-purpose flour
  • 1 teaspoons sugar
  • 1 tablespoon baking powder
  • 1 teaspoon salt
  • 8 tablespoons butter, cubed
  • 3/4 cup milk (I used soy milk)
  • 1 cup of cheddar cheese shredded plus more for topping biscuits if desired.
  • 1 tsp garlic powder
  • 1 tsp parsley flakes
Method:

In a large bowl combine flour, sugar, baking powder and salt together. Cut butter into mixture until it begins to look like cornmeal.

Mix in the cheese, garlic powder and parsley flakes.

Make a well with flour mixture and slowly add milk into the middle. Knead dough with your fingers and add milk when necessary.

Because I wanted them to look like cheddar bay biscuits, I spooned out messy balls on a baking sheet instead of rolling them out and cutting out circle. I then topped them with a bit more cheese.

Bake for about 15 minutes or until golden brown in a 350 degree oven.


I'm also submitting this recipe to Joelen's Tasty Tools Event that is highlighting baking sheets this month. Check out her blog in the new year to see what other goodies people made with baking sheets or submit your own!

Monday, December 8, 2008

Sangria


Nope, I'm not done with Thanksgiving posts yet. We had a LOT of food and there are many more posts to come =)

I always associate sangria with happy and fun times, so it makes sense to serve it during Thanksgiving (or any other party and even just for a quiet evening at home!).

My version is probably not too authentic, but it tastes yummy!

And I'm submitting this to Joelen's Floribbean Adventure since it has rum in it. Thanks Joelen for hosting yet another great event.

Ingredients:

  • 1 bottle of red wine
  • sugar to taste
  • 2 cups of orange juice
  • rum (optional)
  • splash of soda water or 7up/Sprite
  • fruit - I used lemon slices, apples chunks & grapes halved, but whatever you have on hand should be fine.
Method:
  • Pour the wine, and orange juice into a jug.
  • Add a bit of rum or grand marnier for a little extra alcohol content since we're "watering down" the wine. You can skip this step too.
  • Add a splash of soda water or 7up/Sprite for some fizz. This step is also optional.
  • Then microwave some sugar with a bit of water. Let it cool down and then pour that into the jug too. I like to do it this way because whenever I pour the sugar straight in, it never melts. Making a simple syrup to pour in is much easier. Do a little at a time until the sangria has reached your desired level of sweetness.
  • Toss in the fruit.
  • Cover the jug and put it in the refrigerator for at least a few hours.
  • Serve it to your happy guests and have a great time!

Saturday, December 6, 2008

Phyllo Brie Cups


First off, lemme just say, this appetizer totally wasn't worth the effort and didn't come out exactly as I had hoped, but I'll share it with you anyway.

I've since seen some recipes that put a slice of brie on a cracker with some sugar or fruit compote and nuts. Why didn't I run across those or think of it myself before I went to all this trouble? Sheesh! Next time, I'm going with that method instead for sure!

Anyway, this was inspired by baked brie wrapped in puff pastry. For that appetizer, however, you need the whole wheel of brie, but I wanted to use some of it for our cheese plate as well, so I thought I'd try making individually-sized baked brie. It didn't quite turn out the way I had hoped, but at least the cheese plate looked nice =)

My version wasn't quite as melty and the phyllo cups were too delicate to make them a good finger food, plus making the cups was pretty time-consuming. The flavor was good though, so I definitely think I'll be trying the puff pastry or cracker versions in the future.

Ingredients:

  • phyllo dough
  • brie
  • melted butter or oil
  • brown sugar or fruit compote of some sort
  • nuts (I used walnuts)
Method:
  • Cut the phyllo dough into 2x2 inch squares. Layer them on top of each other in a spiral shape in a cupcake mold, brushing each layer with the butter/oil to create a cup. Put them into a 350 degree oven for about 15 minutes until slightly crispy and browned.
  • Take the phyllo cups out and add some brie to the bottom, sprinkle with brown sugar or fruit compote and top with a few nuts. Put them back into the oven until the cheese is melted and declicious.

A Simple Spinach Salad


I've got another quick recipe from our Thanksgiving feast. Spinach salad!

Thanksgiving is filled with so many heavy dishes that I thought I'd offer something on the lighter side in case anyone was interested.

Just wash and spin-dry some spinach and sprinkle it with dried cranberries, walnuts, crumbled bacon, and if you'd like cheese. I totally forgot to put the cheese in (oops!) but normally I like blue cheese though goat or feta would probably be great too.

I made a simple balsamic vinaigrette that I put on the side so that the salad wouldn't get soggy.

So easy and you can make it way ahead of time too!

Tuesday, December 2, 2008

Roasted Sweet Potatoes

Sweet potatoes are already so sweet and delicious on their own that I really don't think they need all the gunk like marshmallows that are typical of a Thanksgiving dinner. Just peel, cube and toss in some oil or melted butter and toss them in a 350 degree oven to roast until soft. A light sprinkling of brown sugar on top for extra carmelization is a nice touch, but not necessary at all.

I accidentally picked up a white-fleshed yam and actually think it makes for better presentation and will do it on purpose next time! Mixing the white in breaks up the sea of orange and tastes great too. A little greenery such as a sprig of mint completes this simple yet tasty dish.

Monday, December 1, 2008

Cranberry sauce

What's Thanksgiving without cranberry sauce? I grew up with canned cranberry and never saw the point of cranberry sauce because I wasn't a fan of the canned stuff but felt it was necessary for traditional reasons. Last year, we made our own cranberry sauce for the first time and am now a big supporter of cranberry sauce for the taste, not just tradition. Plus it's super easy!

Ingredients:

  • 1 bag of cranberries
  • orange juice (about 2 cups)
  • sugar to taste
  • grated lemon/orange zest (optional)
  • grated ginger (optional)
Method:
- Pour the cranberries and orange juice into a pot. Make sure there is enough liquid to cover the cranberries (if the cranberries didn't float).
- Bring everything to a boil. The cranberries will start popping. Bring it down to a simmer and add sugar to taste (you'll need a lot). You can also add the ginger and zest if you want at this point.
- Simmer until the cranberries have all popped and the sauce has thickened. Let it cool and put it into the fridge for it to set and thicken even more.
- Serve with your roasted turkey or smear it on the bread of that turkey sandwich the next day!

Saturday, November 29, 2008

Thanksgiving Turkey


We hosted our second Thanksgiving this year and I'll slowly post all the recipes as I get time. But for now, I'll start with the most important part - the turkey!

I did a few things differently from last year and I think for the most part, they were good changes. Here's what I did this year along with a few tips and tricks that I've learned.

  • The biggest difference is that I bought the Trader Joe's fresh pre-brined turkey instead of the usual Butterball. Both were good and juicy and I'm not really sure if I have a preference. I think next time, I'm going to try brining my own and see how that goes.
  • I put the turkey uncovered in the fridge for a few hours because I heard that helps with a crispier skin. I did get a crispier skin this year, but I'm not sure if this is the reason or if it was because I used oil instead of butter. Either way, it's not much trouble and the turkey is much easier to work with after being in the fridge since the skin is much drier and not so slippery, so I'll probably continue to do this in the future.
  • Last year, when the breast was perfectly cooked, the dark meat still needed more time in the oven. I learned a little trick from America's Test Kitchen to ice the breast so that the cooking time for white and dark meat even out. It worked like a charm! Just leave the bird out for a while to come closer to room temperature, then flip the bird breast side down on a bag of ice and stick some ice inside the bird too to cool down the breast meat.
  • I then slathered the turkey with a rosemary, lemon zest, and oil mixture that I made in the food processor. I definitely prefer this to the butter, rosemary, and lemon zest mixture I used last year. Last year, I stuck butter under the skin and on top, but it was difficult to get the butter to stick on the skin of the turkey. Oil is much easier. Plus, I think the oil made the skin much crisper than the butter, though that may also have been from leaving it in the fridge uncovered to dry out the skin.
  • Next, I heavily salt and peppered the skin all over.
  • I also like to stuff the bird with slices of apple, lemon, orange, and rosemary twigs for extra flavor and moisture.
  • Stick a thermometer probe in the deepest part of the breast and another in the deepest part between the leg and body, being careful not to hit the bone, and then pop the turkey in a 500 degree oven for 30 minutes. I learned this trick from Alton Brown. Doing this step will give you nice, perfectly browned skin.
  • After 30 minutes, cover the breast with foil and turn the heat down to 350. Cook until the thermometers read an internal temperature of 161 degrees. My 17.5 pounder took a little less than 4 hours.
  • Take the bird out of the oven and let it rest for at least 15 minutes. I served mine on a platter with a lemon flower, a few cranberries and steamed broccoli.
  • After presenting the turkey and taking a few pictures, the hubz took it and carved it and put it back on the serving platter. Didn't he do a great job?
I hope you had a Happy Thanksgiving!

This is also my submission to Joelen's Tasty Tools event featuring roasting pans. Check out Joelen's Culinary Adventures to see what other goodies people made using roasting pans.

Wednesday, November 19, 2008

Simple Grillin'

Having an indoor grill is great, especially when we're cooking just for the two of us. There's no need to fire up the entire grill for just a steak or two. Plus we can grill all year long this way.

The hubz is the grill master in this house, so I don't have much to say in this post except that he makes great steaks! He's a strong believer in tasting the meat, so nothing more is added than salt and pepper. Our favorite cut is bone-in ribeye. It's flavorful, juicy, and tender.

Grilled zucchini makes a great accompaniment too. Cut them length-wise. I like to cut them into fourths so that they're thick enough to be meaty but still cook pretty quickly. Brush them with oil and just sprinkle with a bit of salt and pepper. What could be easier?

Sunday, November 16, 2008

Spinach dip

I've got another "healthy alternative" and a use for the leftover yogurt from the naan and crispy yogurt chicken.

I love the spinach dip made with knorr vegetable soup mix, but it's not the healthiest of dips. Replacing the sour cream/mayo with yogurt healthens it up and doesn't change the taste much. It is a bit tarter, but still yummy. The trick, which isn't even necessary, is to drain about half of the yogurt with a cheesecloth to thicken it up. If you don't drain it, it's still perfectly fine. In fact, I always reserve the liquid I drain out in case I want to add some back later for consistency reasons.

And to make it super healthy, serve it with carrot and celery sticks instead of chips, crackers or bread!

This spinach dip makes a great snack to munch on while watching football and Melissa of Made by Melissa is hosting a fun event called Snack Food Sunday every Sunday until the Superbowl. Check out her blog to see other great football snack ideas.

Recipe:

1 pkg frozen chopped spinach, drained and squeezed dry
1 pkg Knorr's vegetable soup mix
1 small can water chestnuts, chopped (I skipped this because we aren't water chestnut fans)
1 container of yogurt (I used fat free)

This part is optional: take half of the yogurt and put it in cheesecloth over a bowl to drain some of the liquid. Save the liquid in case you want to add it back later.
Pour in the soup mix, water chestnuts and spinach. Mix thoroughly and refrigerate for at least four hours. Add back some of the liquid from the yogurt if necessary. Stir before serving.

Wednesday, November 12, 2008

Crispy Yogurt Chicken

After reading so many blogs raving about Pioneer Woman's Crispy Yogurt Chicken, I finally gave in and decided to give it a try. It was mostly because I had leftover yogurt from the naan and everything else necessary already in the house, so why the heck not?

Unfortunately, I gotta say that I am not a fan, sorry. While the chicken (I used chicken tenders instead of drumsticks) was very tender from the yogurt, mine wasn't particularly crispy and it was a bit on the bland side. And it came out really pasty white and never browned nicely either.

One trick that I would try next time is one that I learned from America's Test Kitchen when they did baked chicken parmesan. They pre-crisped and pre-browned the panko crumbs by toasting it in a pan with a bit of oil, and then breaded the chicken with it. What a great little trick, much better than the pasty white things that came out of my oven!

It could be entirely my fault, and probably is. I'm not good at following directions. I read recipes to get a jist of it and then wing it from there, adding and adjusting as I go along according to how lazy I'm feeling and what I have laying around the house. I guess winging it just didn't cut it this time. Oh well.

Anyway, below is how I did it, but I definitely don't recommend it...

Recipe:
inspired by
Pioneer Woman's Crispy Yogurt Chicken

  • Chicken (I used about 10 chicken tenders)
  • Yogurt (I used about a cup of non-fat plain yogurt)
  • A few minced garlic cloves
  • Lemon juice from half of a lemon
  • Salt
  • Panko crumbs
  1. Mix the garlic, yogurt and lemon juice together.
  2. Salt the chicken generously.
  3. Dredge each piece of chicken in the yogurt mixture, then the panko crumbs. Lay flat on a cooling rack over a cookie sheet.
  4. Place the cookie sheet, cooling rack and chicken in a 350 degree oven until cooked through. For these chicken tenders, it took about 20 minutes. Maybe leaving them in longer (and topping them with a pat of butter) would have made them browner and crispier. Who knows...

Sunday, November 9, 2008

Naan


Naan and samosas are what I'm always going back for over and over at Indian buffets. I usually like to dip the naan in some sort of curry, but the naan is the true star of the show. I knew I wouldn't be satisfied with eating the curry and aloo gobi with boring old rice, so I knew I had to make some naan. Unfortunately, the samosas will have to wait until next time.

Making this naan was fun! A bit scary, but fun!

I preheated my oven at 500 degrees with a baking stone on the top rack for 30 minutes. Warning: Don't do this! Put that baking stone on the second to top rack, especially if you have a gas oven like we do. I'll explain later...

After preheating the oven and stone, I turned the oven to broil. This is the best way to simulate a tandoori oven at home and it worked like a charm! I tossed the naan on the baking stone, pushed it in and closed the door. Boy, does that thing puff up! So much in fact that it touched the broiler flames on top and caught on fire! Now do you see why I say it was a bit scary but fun? And also why you probably shouldn't put that baking stone on the top rack and why the second rack might be a slightly better option?

After that little scare, I watched that naan like a hawk. It only takes a few seconds on each side to cook, so I would've been watching it closely anyway, but this was just an extra incentive to pay close attention. As soon as the naan started puffing, I'd poke it and flip it. I don't think the hubz would be too happy if I burned down the kitchen, no matter how good dinner tasted!

The naan was so soft and tasty and was exactly what I was looking for. In the future, I'll try mixing in some onions and garlic for onion naan and garlic naan. YUM!

And I have one last tip before getting to the recipe. Your kitchen will get super hot because you'll be opening and closing that 500+ degree oven every few seconds, so this is definitely not something you want to try on a hot summer day.

Recipe:
inspired by Manjula's Kitchen

- 2 cups of all purpose flour
- 1 tsp active dry yeast

- 1 tsp salt

- 1 tsp sugar

- Pinch of baking soda

- 2 tbps oil
- 2 1/2 tbps yogurt
- 3/4 cup lukewarm water


Dissolve the yeast in the water and let it proof for 10 minutes. Add the sugar, salt, baking soda, flour, yogurt and oil to the water and yeast and knead until the dough is smooth. Cover and let rise until doubled in volume (1-2 hours)

Knead the dough a few time and then divide into 6 pieces. Roll and shape them into tear drops.

To simulate a tandoori oven, put a pizza stone on the second rack from the top. Heat at 500 degrees for at least 30 minutes. Then turn the oven to broil. Toss the naan on the pizza stone one at a time and close the oven door, but keep a constant eye on it. As soon as it puffs up, flip it with tongs. It will only take about a minute or less on each side. You can brush it with butter or ghee if you'd like, but it's not necessary.

Oh, and I almost forgot, I'm submitting this to Joelen's Indian-Jewish Adventure! It's not your typical pairing of cuisines, but both are delicious and she's bound to have some great entries. I hope you check it out!

Indian Chicken Curry

I made a curry chicken as part of the Indian feast we had. I admit, I used jarred curry sauce. Please don't judge me. This was my first attempt as Indian food and I was scared. I did make the naan and aloo gobi on my own though. I'd say that's pretty impressive, right? And now that I've dipped my toes into the world of Indian cooking and have learned that there's nothing to be afraid of, I'll definitely try to make this sans the jarred sauce next time.

Besides, I wasn't particularly impressed by the flavors that came out of the jar so I ended up tweaking it a bit by adding some sliced onions, a bit more curry powder and lemon juice to brighten it up along with a dash or two of some other spices here and there, and last but not least, a few slices of peaches! Yup, peaches. It added a bit of sweetness to the sauce that was really nice and and super subtle since it practically disintegrated after being stewed for a bit. Toss in some chicken and you're good to go! Chickpeas or green peas would be a good addition too!

Wednesday, November 5, 2008

Aloo Gobi


I love love loooooove Indian food, but have never tried to make it myself because honestly, it's a bit intimidating. So many spices, almost all of which I am not familiar with at all. But I've always wanted to learn.

Well, I finally got around to facing my fears and made a pretty darn good Indian feast. Hopefully I'll be able to post the other dishes I made in a timely manner, but for now, let's start with aloo gobi.


Just toasting the spices with the onion smelled sooo good. I'm definitely going to be attempting more Indian dishes in the future!

Recipe:
inspired by Recipezaar and Food Network

(measurements are approximations - add to taste)
- 1 head of cauliflower
- 1 potato cubed
- 1 onion diced
- 1 jalapeno diced finely
- 1 garlic clove minced
- 1 tsp grated ginger
- 1 tsp cumin
- 1 tsp turmeric
- 1 tsp ground coriander
- salt to taste

- Heat a bit of oil in a pot and saute the onions until soft.
- Add the garlic, ginger, jalapeno and all the spices. Toast them until fragrant.
- Add the cauliflower, potato, and a few tablespoons of water. Salt to taste. Cover and simmer until cooked. Add more water if necessary.

Tuesday, October 28, 2008

Pesto Chicken and Green Bean Pasta


I love basil. It has so many uses and pesto is one of my favorites. I made pesto pasta with chicken and green beans and want to submit this to Presto Pasta Nights which was created by Ruth at Once Upon a Feast and is being hosted by Melissa at The Cooking Diva this week. Check it out on Friday to see everybody else's great entries! Happy early Halloween by the way!

Anyway, my basil plants flowered quite a while ago, and apparently (though I haven't tried it), after it flowers, the leaves become bitter. Does anyone know how to keep basil from flowering besides pinching them on a regular basis? Pinching is just way too labor intensive for a lazy girl like me...

Before the leaves got bitter, I took them all and made a big batch of pesto and froze it to use throughout the year. Usually, I use my food processor to make my pesto, but I decided to minimize the mess and try using my immersion stick blender. Even though it still tasted great, it made the pesto too smooth. I like a bit of chunkiness to mine, so next time, I'm switching back to my tried and true food processor method.


I also substituted chicken stock for most of the olive oil. Yes, it changes the taste a bit, but it's still good. Plus I've always found pesto sauce to be too oily anyway, so I prefer it this way. And it's healthier! Everybody wins! Yay!

As far as putting the pesto with chicken and green beans, that's something I learned from Paolo, the Italian grocer/restaurateur I met in Hong Kong who also taught me spaghetti bolognese and many other Italian goodies. According to him, the traditional way to eat pesto in Genoa is spaghetti, potatoes and green beans, and lemme tell you, it is dee-lish that way! But I figured with the pasta, I don't really need any more carbs, so I left out the potatoes and added some chicken to make a more well-rounded meal. It may not be as traditional, but it's still just as yummy.

Pesto Sauce:
(as usual, I don't actual measurements because I just eyeball things, sorry)
- Basil leaves (about 3-4 handfuls)
- Pine nuts (about 1 small handful)
- 2-3 garlic cloves
- Chicken stock/Olive oil
- grated Parmesan cheese (a healthy handful)
- Salt and pepper

This step is optional, but I like to toast my pine nuts in a dry pan to give it a bit more color and bring out the flavor and aroma.

Put the basil, pine nuts, garlic cloves and cheese in a food processor and pulse it a bit. Slowly add the chicken stock/olive oil while pulsing until it reaches the desired consistency. Try not to over-process it and leave it slightly chunky - unlike mine =(. It's less of an issue with a food processor than an immersion blender though.

Salt and pepper to taste (don't worry about this part too much because you can always adjust it when you actually use it).

Put them into small containers and freeze for future use. I find muffin tins to be a good size to freeze them in, and then transfer them to a ziploc bag after they've hardened.

Pesto Chicken and Green Bean Pasta:
- Chicken (I prefer boneless, skinless chicken thighs for this)
- Green beans
- Pasta
- Pesto sauce
- Salt and pepper
- Parmesan cheese (optional)

Salt and pepper the chicken and grill until cooked through and nicely browned. Let it rest for a few minutes and then cut it into bit size pieces. Set aside.

Boil the green beans until cooked through and drain. Set aside.

Cook pasta according to the directions on the package and drain. Set aside.

Mix the pasta, chicken, green beans and pesto sauce over low heat. Salt and pepper to taste and feel free to add a healthy dose of parmesan cheese on top too!

Saturday, October 25, 2008

A year later...

I'm a bit late on posting this, but we had our one year anniversary a little while ago and our wonderful bakery gives us a FRESH anniversary cake instead of making us eat frozen one-year-old cake! All we had to do was bring in a picture of the original cake for their portfolio.

They even fashion the anniversary cake after the original with fondant, ribbon, flowers and all!
Yummy!

Sunday, October 12, 2008

Japanese Curry


I had leftover katsu because I figure if I'm gonna make a mess breading and frying stuff, I might as well make extra, right? I also thought I'd mix things up a bit with the extra katsu and make some japanese curry to go with it for Katsu Curry!

In the end, the hubz and I decided we liked the katsu better with the katsu sauce and the curry on it's own over rice. Either way, japanese curry is a winner in my book =)

I'm also going to submit this entry to Joelen's October Tasty Tools event! She's highlighting Dutch Ovens this month and I can't even begin to tell you how much I loooooove my Le Creuset. Even though this dish can technically be made in any old pot, I used my Le Creuset dutch oven for it, so it qualifies for Joelen's event!


Ingredients:
- 2/3 lbs ground meat (other non-ground meat like chicken or beef would be good too)
- 3 carrots peeled and chopped
- 1 onion diced

- 1 tsp minced ginger
- 1 potato diced

- 1 tbs of oil
- 2 tbs of flour
- 1 tsp of curry powder
- water or chicken broth as needed
- 2.5 blocks of S&B Golden Curry (pictured below)


Brown the meat and then remove it from the pot. Or if you're lazy like me, you can add it into the pot after sauteeing the onions and toasting the flour and curry powder.

Heat the oil and add the onions. Sautee until soft.

Add the flour and curry powder and toast until fragrant.

Add the ginger, carrots, potato, the browned meat and water/broth to deglaze the pan and make a sauce.

Add the blocks of curry and stir until melted. Simmer the curry until the vegetables are soft. Keep adding broth/water as needed and to make as much sauce as you'd like. Taste. If it needs, add more curry powder, salt, white pepper, etc as needed.

Wednesday, October 8, 2008

Chicken Katsu


Panko is everywhere these days, and why shouldn't it be? It makes things much lighter and crunchier than traditional bread crumbs - it's great!

Before the whole panko craze, I always kept it in my pantry for making katsu and it's still one my favorite uses for it. Just fry up a few of these babies and serve it with some rice and steamed or sauteed veggies and you've got a great meal. You can use pork instead of chicken for tonkatsu too!

Ingredients:
- Chicken
- Flour
- Salt

- Egg
- Panko

- Oil


Take boneless, skinless chicken breast or thighs and either cut or pound them to an even thickness.

Mix the flour with a bit of salt in a plate. Mix an egg with a bit of water in another plate. Spread panko crumbs out in a third plate. Here's what my breading setup looked like.
Heat up enough oil to cover at least half the thickness of the chicken to about 300 degrees.

Take each piece of chicken and lightly coat it in the flour mixture and pat off the excess flour. Then drag it through the egg mixture and let the excess drip off. Lastly, pat it in the panko crumbs. I found that holding the corner of the chicken with your thumb and forefinger and dipping it in each mixture without letting go was the best way to go. Yes, one corner won't have breading, but honestly, after it's been fried up, you can't even tell which corner you were holding on to.

Next, carefully put it into the hot oil and fry it for a few minutes on each side until golden brown and cooked through.

Dip it in some katsu sauce and enjoy. You can probably make the sauce yourself with some ketchup, worcestire sauce, garlic powder and maybe some vinegar? Add some honey and/or brown sugar if you like the sweet hawaiian style sauce better. I've never tried making the sauce, but if I were to, I'd start with that and then make adjustments as needed. Or, you can just buy this -
I hope you like it!

Tuesday, September 30, 2008

Corn chowder


Who says chowders have to be unhealthy? This had minimal butter, no cream, lotsa veggies, and soy milk! And it tasted great (in my opinion at least). My brother always laughs at me because I'll drink diet coke and eat french fries smothered in cheese, guacamole, and carne asada (the best thing ever by the way if you've never tried it - a San Diego hole in the wall Mexican specialty). But my argument is that if a comparable lower calorie version of carne asada french fries existed, I'd eat it. Unfortunately, there isn't, but there is one for soda, so I might as well take advantage of that, right?

I'm always about finding comparable healthy alternatives. I've baked eggrolls before, made creamless creamed spinach, baked potato wedges/chips, etc. and now I'm on to my healthy version of corn chowder, I hope you like it!


Ingredients:
- 2 tbs butter
- flour
- 1 can of corn
- 1 onion finely diced

- 2 ribs of celery chopped

- 1 potato diced

- 1 chicken breast

- 1 cup soy milk

- 1 cup chicken stock or water

- 1 tsp oregano

- 1 tsp parsley

- salt and pepper to taste


Method:
Melt the butter in a heavy pot and add flour a little a time to make a rue. Keep adding the flour until it can't hold anymore.

In a separate pan (or take the rue out and use the same pan), sweat the onions until softened. Add a pinch of salt to help with the process.

Add it to the pot (or add the rue back in).
Add the can of corn, with the liquid, soy milk and chicken stock/water. Stir to break up the rue and thicken the soup.

Toss in the celery, potato and the chicken breast to poach. Bring everything to a boil then turn down to a simmer.

When the chicken is cooked, take it out and shred it and put it back in. Add the herbs and salt and pepper to taste and enjoy the comforting goodness of this healthy corn chowder.

Monday, September 22, 2008

Tortilla Soup


I love soup. Whenever restaurants ask if I want soup or salad, I always go for the soup. I made this soup with the leftover liquid from the carnitas. It would be such a shame to waste all that flavorful broth. Why do they sell chicken and beef broth, but not pork broth? Pork broth is yummy too, isn't it?

Anyway, this soup is also a great way to use up stale tortilla chips or the small broken ones at the bottom of the bag. Unfortunately, I was a dummy that forgot to add the tortilla in before taking the picture. Oops. But I'm sure you can use your imagination.

Since I used leftover carnitas liquid, I don't have measurements for ingredients. Mine are always just estimations anyway and really done more by taste than anything, but here it is...

Ingredients:
- Pork broth (chicken would work fine too)
- 1 chicken breast

- 1 can of corn
- 1 can of black beans rinsed

- 2 ribs of celery sliced

- 2 carrots diced

- 1 onion diced

- 2 cloves of garlic minced

- 1 jalapeno minced finely

- cumin to taste

- chili powder to taste

- salt to taste

- black pepper to taste


Method:

- Saute the onions until soft and add the garlic, cumin and chili powder. Toast the spices until fragrant.
- Add the carrots and celery and saute for a few minutes.
- Pour in the broth and bring to a boil.
- Add the jalapeno and chicken breast. Simmer until the chicken breast is cooked. Remove the chicken breast, and shred it.
- When the vegetables are soft, add the chicken back in, the corn and black beans.
- Heat everything through, add salt and pepper to taste and serve it with some tortilla chips and a dollop or sour cream if desired. Diced avocado would be a wonderful addition too.
Enjoy!


Tuesday, September 16, 2008

Crispy, Juicy Carnitas


Contrary to popular belief, Cinco de Mayo is NOT Mexican independence day. Sept 16th is! So in honor of it, I'm posting this today. Happy Mexican Independence Day!

I had no idea carnitas were so easy to make. I'm definitely making this a lot more in the future, especially since it was so yummy!

Having a pressure cooker really makes life a lot easier too. Pressure cookers are really amazing. Instead of braising for hours on end...I popped the meat in for half an hour and *poof* it's done! It's like magic!
On top of being so delicious and easy to make, they're healthy too. I always thought that carnitas were deep fried to get their crispy goodness, but they don't have to be. All they need a bit of time in the oven for nice crispy edges and a juicy interior.

Put it on a tortilla with some chopped onions, cilantro and hot sauce and you've got yourself a great meal!

I'm also submitting this for Joelen's TGIF Happy Hour that is featuring margaritas and other Mexican goodies.

Ingredients:
- 4 pounds of pork butt (shoulder)
- 1.5 tbs of salt (plus more to taste)
- 1 tsp cumin (plus more to taste)
- 1 tsp chili powder (plus more to taste)
- 5 grinds of ground black pepper (plus more to taste)
- 1/2 tsp cinnamon
- 1 bay leaf
- 1 onion
- 1 jalapeno
- 3 cloves of garlic

Method:
Cut the pork into ~2x2 inch cubes. I think this is a good size because it cooks quicker than not cutting it into chunks but still keeps it really juicy.

Sprinkle the seasonings on the meat and put it into a pressure cooker or large pot if you don't have a pressure cooker. Rough chop the onion and jalapeno and toss them in. Crush the garlic and throw that in the pot too. Next add water until the meat is barely submerged if using a pressure cooker, or until fully submerged if you're using a pot.

If you're using a pressure cooker, heat until fully pressurized and keep it there for 30 minutes or until tender. If you're using a regular pot, put a lid on it and put it into a 300 degree oven, or simmer on the stove top for a few hours until tender. A slow cooker would work too.

When the meat is cooked and falls apart easily, remove the onions, garlic, bay leaf and jalapeno if you can find them. Drain all but 1/2 an inch of the liquid.

Lightly smash each cube of pork so that it falls apart just a little bit, but not totally shredded. The reason I do this is to maximize the surface area that will get extra seasoning and will get crispy in the oven, but not so much so that it dries out and is no longer juicy.

Sprinkle on additional amounts (to taste) of the same seasonings you used before. Don't be scared to be generous with the seasonings.

Pop it into a 350 degree oven for about 10-20 minutes or until the tops and edges are dry and crispy and most of the liquid has evaporated.

Shred the meat with a fork or your fingers. Serve it in a tortilla with some chopped onions, cilantro, hot sauce and any other toppings of your choice.

Tuesday, September 9, 2008

Stuffed Baguettes


These are like the best things ever! This is the same recipe as the baguettes I made earlier, but stuffed with ooey gooey cheese and other goodies. I did a few experiments with pesto and artichokes, blue cheese and bacon, salami and cheese, and our favorite, ham and cheese. Look at that cheese oozing out - yum!

The first time I made this, I made 2 baguettes and 2 stuffed baguettes. The stuffed ones were such a hit that they disappeared within hours of coming out of the oven! Since they were so good, I thought I'd make more and freeze them, but the next batch of 6 never made it to the freezer before getting gobbled up. I tried one more time to make a batch for freezing and finally succeeded. They freeze really well and still taste great heated up in a toaster oven.

I definitely recommend giving these a try!

And also as an update to my last entry about the baguettes, I used bread flour and a baking stone this time and it seemed to help with making more larger air bubbles, but it may also just be my imagination. Who knows...

I'm also submitting this for Joelen's September Tasty Tools Event. She's highlighting bakeware this month and since I used a baking stone, silpat, and cooling rack, that should qualify, right? The roundup will be posted on October 5th, so keep your eye out for it!

From King Arthur's blog:
Starter
1/2 cup water
1 cup Bread Flour
1/8 teaspoon instant yeast
Dough
All of the starter
3 1/2 cups Bread Flour
1 cup water
1 1/2 teaspoons salt
1/4 teaspoon instant yeast


The Starter: Mix the starter ingredients together till smooth, cover, and let rest at room temperature overnight.
Preparing the Dough: Combine all of the dough ingredients and mix and knead them together -- by hand, mixer or bread machine -- till you've made a soft, somewhat smooth dough; it should be cohesive, but the surface should still be a bit rough. Allow the dough to rise, covered with lightly greased plastic wrap, for 3 hours, gently deflating it and turning it over after 1 hour, and then again after 2 hours.

Turn the dough out onto a lightly greased or floured work surface. Divide the dough into two pieces (if you're using our Steam Baking Master, or three pieces, for longer, thinner baguettes. Shape each piece into a rough, slightly flattened oval, cover with greased plastic wrap, and let them rest for 15 minutes.

Divide the dough into six pieces. Flatten each piece into a 5" square. Layer with the stuffing of your choice—a slice or two of ham or salami, some cheese, mustard—and roll up like a jelly roll, pinching the ends and the side seam closed.

Place the logs in the folds of a floured couche or floured cotton dish towel, which you've set onto a sheet pan or pans. Or place them directly onto the pan (lightly greased or parchment-lined). Cover them with a proof cover or lightly greased plastic wrap, and allow the loaves to rise till they have become quite puffy, but haven't doubled in size; this will take about 60 to 90 minutes.

Preheat your oven to
425°F; if you're using a baking stone, place it on the lowest shelf. Roll the risen baguettes from the couche onto the lightly greased or parchment-lined pan of your choice -- or onto a peel, if you're baking directly on the stone. Spritz the baguettes heavily with warm water; this will help them develop a crackly-crisp crust. Using a very sharp knife held at about a 45° angle, make three 8” vertical slashes in each baguette. Place the baguettes in the oven.

Bake the baguettes
in a 425°F oven for about 25 minutes, until they're golden brown. Yield: six stuffed baguettes.

Sunday, September 7, 2008

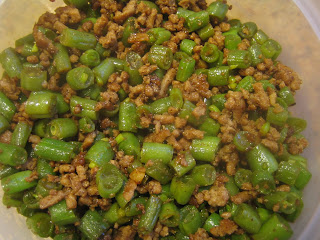
Sa Cha Green Beans and Meat


August was pretty pathetic, huh? Only 3 posts...sorry about that. Things have been busy, and are still busy, but I'll try to be better about posting. And with this post, I only need 3 more to "improve" on last month!

Sa cha
sauce is often referred to as Chinese BBQ sauce though it doesn't resemble BBQ in the traditional sense at all. Sa cha is a little spicy, a little smokey, not sweet at all, very unique and very yummy. Typically I like to use Chinese long beans for this dish, but I didn't have any on hand, so I used regular green beans and it still turned out great.

Ingredients:
- 1 tbs cooking oil
- approximately 1 pound of green beans or Chinese long beans
- approximately 1/3 pound of ground pork (or turkey/chicken)
- 1 garlic clove minced
- approximately 1 tbs soy sauce (to taste)
- approximately 2 tbs of sa cha sauce (to taste - I like a lot, so you should probably start with less and add keep adding it to your liking)

Method:
If you're using green beans, clean and cut them into ~1/2" dices. If you're using Chinese long beans, cut them into smaller pieces.

Heat some oil in a pan/wok and add the garlic, ground meat and soy sauce and keep it moving until mostly cooked through.

Add the green beans and sa cha sauce and keep everything moving until it's all cooked through. Taste the dish and add more soy/sa cha according to your preferences and serve over fluffy white rice.

Sunday, August 31, 2008

Banana Bread


Can you believe I made this in my toaster oven? The little loaf pan looked so small and lonely in the big full-sized oven that it decided to try to use the toaster oven - and it fit! However, I don't know if it's the recipe of the toaster oven or some other problem of my own (I'm not exactly the best baker out there after all), but the bottom was on the verge of burning and the banana bread was a bit on the dry side. So I cannot recommend this recipe, nor can I recommend baking banana bread in the toaster oven, but I also don't NOT recommend them. =P

At least it looks good, right?

I used a recipe from Joy of Baking in case you want to give it a try. Hopefully yours will turn out better than mine!

Ingredients:

1 cup (115 grams) walnuts or pecans, toasted and coarsely chopped (optional)

1 3/4 cups (245 grams) all-purpose flour

3/4 cup (150 grams) granulated white sugar

1 teaspoons baking powder

1/4 teaspoon baking soda

1/4 teaspoon salt

1 teaspoon ground cinnamon

2 large eggs, lightly beaten

1/2 cup (113 grams) unsalted butter, melted and cooled

3 ripe large bananas (approximately 1 pound or 454 grams), mashed well (about 1-1/2 cups)

1 teaspoon pure vanilla extract

Method:

Preheat oven to 350 degrees F (180 degrees C) and place oven rack to middle position. Butter and flour (or spray with a non stick vegetable/flour spray) the bottom and sides of a 9 x 5 x 3 inch (23 x 13 x 8 cm) loaf pan. Set aside.

Place the nuts on a baking sheet and bake for about 8 to 10 minutes or until lightly toasted. Let cool and then chop coarsely.

In a large bowl combine the flour, sugar, baking powder, baking soda, salt, cinnamon, and nuts. Set aside.

In a medium-sized bowl combine the mashed bananas, eggs, melted butter, and vanilla. With a rubber spatula or wooden spoon, lightly fold the wet ingredients (banana mixture) into the dry ingredients just until combined and the batter is thick and chunky. (The important thing is not to over mix the batter. You do not want it smooth. Over mixing the batter will yield tough, rubbery bread.) Scrape batter into prepared pan and place the slices of banana on top of the batter for garnish. Bake until bread is golden brown and a toothpick inserted in the center comes out clean, about 55 to 60 minutes. Place on a wire rack to cool and then remove the bread from the pan. Serve warm or at room temperature. This bread can be frozen.

Makes 1 - 9 x 5 x 3 inch loaf.

Tuesday, August 19, 2008

Chicken Fajitas

First of all, I apologize for the lack of posts lately. Work and life have been busy, but I have lots of pictures in my backlog that I'll hopefully get around to posting about one of these days. Unfortunately, it doesn't look like work or life is gonna let up for a while, but here's a quick and easy fajita recipe for now...

I grew up in a Chinese household that ate mostly Chinese food. I learned to cook various Chinese dishes and spaghetti out of a jar. Fajitas were my first attempt at something that was non-Chinese and non-spaghetti. It seemed like a simple enough dish to use as a means of "popping my cherry" into the world of western cooking, but guess what...it tasted like Chinese stir fry! What the heck? I didn't use any soy sauce or chili paste or anything else remotely Asian, I swear!

After that experience, I shyed away from western cooking and tried to stick to what I knew, happy to live in culinary ignorance. After all, that's what restaurants are for, right? Then one fateful day, after years of cooking Chinese food day in and day out for my man, the hubz (boyfriend at the time) mentions to me in casual conversation that he's not really a fan of Chinese food and would much rather eat Western food. What?!?! NOW he tells me this??? I had no idea! He ate everything I made without complaint for years, how was I supposed to know? I guess that just goes to show you how much loved me, not wanting to hurt my feelings and showing support for my efforts. What a sweetie pie, huh? I guess he was just being sweet like that...smiling his way through torturous meals.

Well, wanting to be a good girlfriend and make his tummy happy, I started to branch out a bit. It's been a long road and I still have much to learn and am continuously improving, but I'm having lots fun in the process! I also finally figured out how to make fajitas that don't taste like stirfry!

Ingredients:
- tortillas
- 1 chicken breast
- 1 bell pepper (sliced thinly)
- 1 onion (sliced thinly)
- salt or seasoned salt
- pepper

Optional condiments:
- salsa, guacamole, sour cream, cheese, mexican rice, beans, etc.

Method:
Salt and pepper the chicken and grill. Let rest and slice.

Grill the peppers and onions or sautee with a bit of oil, salt and pepper.

Stick everything in a tortilla and add condiments as desired.

Sunday, August 3, 2008

Baguette


Wow, this was definitely a labor of love! One 14 hour rise for the starter, 3 hour-long rises before shaping the dough, then one last 60-90 minute rise after shaping. Granted, it's mostly a lot of waiting around, but you gotta really plan ahead and probably shouldn't stray too far since you gotta come back and tend to it pretty often.

Was it worth it? Most definitely! But I think I'm going to try to make extra and freeze the dough next time? If you have any experience with this, please let me know if that's a bad idea. Otherwise, when I eventually get around to trying it out, I'll let you know if it's a bad idea or not...

Another thing that I'd like to see is more/bigger air bubles like a store-bought baguette. Maybe a baking stone would've helped with that? So would using bread flour instead of all purpose? Guess who's going shopping!

Anyway, I found this recipe on King Arthur's blog. I wonder if I could shortcut the recipe and add more yeast and shorten the rising times, but I probably shouldn't press my luck. I've come a long way from messing up cupcakes out of a box and have no desire to go back to my old ways of not following directions and screwing everything up.

Enjoy!

Note: I actually made the baguette before I made the bruschetta (I just hadn't written up the post yet) and used it for the bruschetta. Yummy yummy!

Starter
1/2 cup water
1 cup King Arthur Unbleached All-Purpose Flour or European-Style Artisan Bread Flour
1/8 teaspoon instant yeast
Dough
All of the starter
3 1/2 cups King Arthur Unbleached All-Purpose Flour or European-Style Artisan Bread Flour
1 cup water
1 1/2 teaspoons salt
1/4 teaspoon instant yeast

The Starter: Mix the starter ingredients together till smooth, cover, and let rest at room temperature overnight.
Preparing the Dough: Combine all of the dough ingredients and mix and knead them together -- by hand, mixer or bread machine -- till you've made a soft, somewhat smooth dough; it should be cohesive, but the surface should still be a bit rough. Allow the dough to rise, covered with lightly greased plastic wrap, for 3 hours, gently deflating it and turning it over after 1 hour, and then again after 2 hours.

Turn the dough out onto a lightly greased or floured work surface. Divide the dough into two pieces (if you're using our Steam Baking Master, or three pieces, for longer, thinner baguettes. Shape each piece into a rough, slightly flattened oval, cover with greased plastic wrap, and let them rest for 15 minutes.

Working with one piece of dough at a time, fold the dough in half lengthwise, and seal the edges with the heel of your hand. Flatten it slightly, and fold and seal again. With the seam-side down, cup your fingers and gently roll the dough into a log that would fit whatever pan or baking stone you'll be using to bake in. Place the logs in the folds of a floured couche, which you've set onto a sheet pan or pans, or directly onto the pan (lightly greased or parchment-lined). Cover them with a proof cover or lightly greased plastic wrap, and allow the loaves to rise till they have just about doubled in size, about 1 1/2 hours.


Note: For the best, most crispy-crackly crust, cover the shaped baguettes in plastic wrap and refrigerate overnight. The next day, let them rest at room temperature for 30 minutes, covered, while you preheat your oven.

Preheat your oven to 425°F; if you're using a baking stone, place it on the lowest shelf. Roll the risen baguettes from the couche onto the lightly greased or parchment-lined pan of your choice -- or onto a peel, if you're baking directly on the stone. (If you're using the Steam Baking Master, follow the manufacturer's baking directions.) Place the baguettes in the oven.

Bake the baguettes for 25 to 30 minutes, until they're a deep, golden brown. Turn off the oven, crack it open about 2 inches, and allow the baguettes to cool in the oven. Yield: 2 shorter, fatter baguettes or 3 longer, skinnier baguettes.