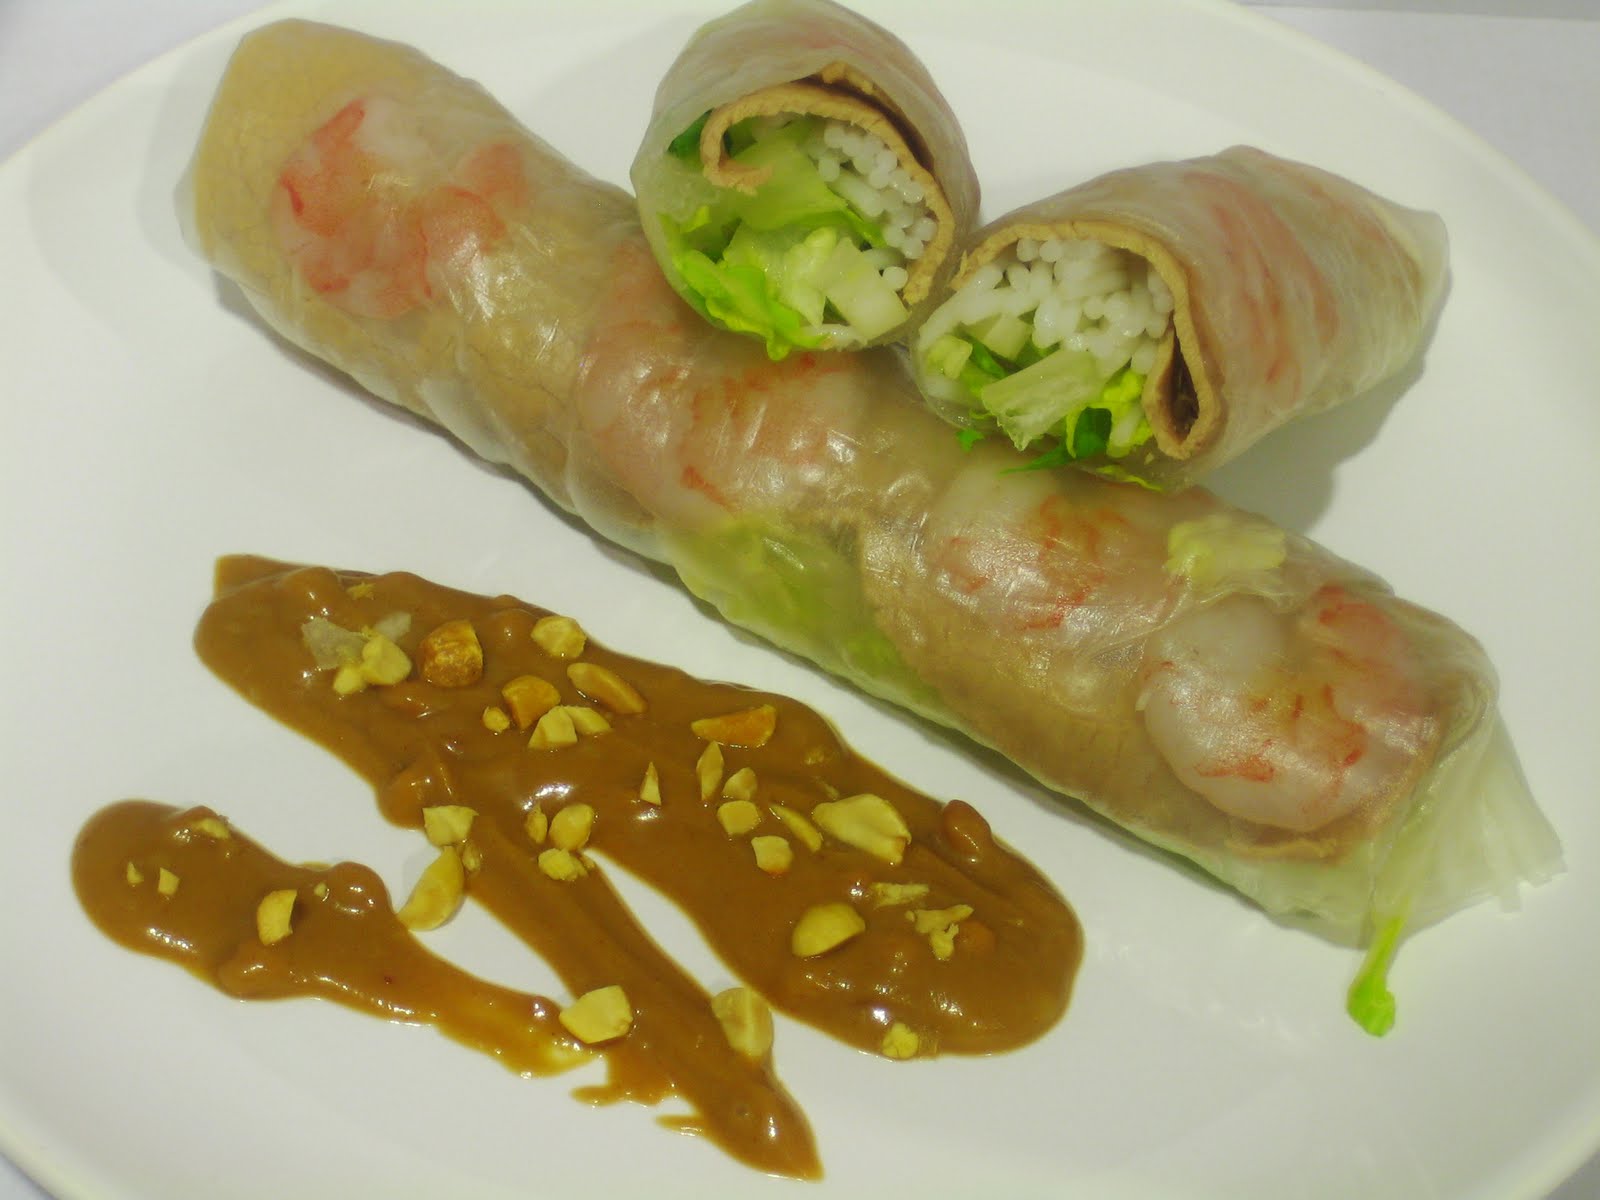
Whenever I go to Vietnamese restaurants, I always have an internal struggle between ordering the fried eggrolls and the fresh spring rolls. Usually, the fried ones win, but since the weather is warming up, this seems more fitting.
Ingredients:
(Rolls)
- Rice paper
- Rice noodles
- Shrimp
- Thinly sliced meat (I used eye of round that was pre-sliced for hot pot purposes)
- Lettuce
(Sauce)
- Peanut butter
- Hoisin
- Water
- Fish sauce
- Crushed peanuts
- Chili sauce (optional)
Directions:
(Rolls)
- Boil the rice noodles until fully cooked, then rinse it with cold water and set aside.
- Slice the lettuce into quarter inch strips and set aside.
- Cook the shrimp, then cool it, slice them in half if desired and set aside.
- Cook the meat, cool it, and set aside.
- Fill a pan large enough to fit the rice paper with water.
- For each roll, quickly dip two sheets of rice paper in the water (on both sides) and stack them on top of each other, flat on a cutting board. On my first roll, I let the paper soak in the water until it was fully soft. That was too soft and the rice paper fell apart. On my second, I just dipped it quickly, but found that it was still not enough because it'd rip when I tried rolling the spring rolls. Then I tried to dip two quickly and found that was perfect. You can experience yourself too, to see what works best for you.
- Lay a line of shrimp (pretty side down if you sliced them in half) on the softened rice paper.
- Lay a line of the meat on top of the shrimp.
- Lay a line of noodles on top of the meat.
- Lay a line of lettuce on top of the noodles.
- Fold in the edges and wrap up the filling into the spring roll.
- Repeat for each roll.
(Sauce)
- Scoop some peanut butter into a bowl and add a bit of water.
- Pop it in the microwave for a few seconds to help melt the peanut butter.
- Stir the peanut butter/water mixture until smooth.
- Add hoisin sauce and just a dash of fish sauce to taste (a little goes a looong way, so don't add too much).
- Add some chili sauce if desired.
- Stir everything together until it achieves the taste and consistency you desire.
- Top with crushed peanuts and dip spring rolls in the sauce.
Saturday, April 17, 2010
Vietnamese Spring Rolls

Tuesday, March 30, 2010
Crispy Pan-Fried Noodles
 Chow mein is great on it's own, but frying the noodles makes it even better!
Liang mian huang or crispy pan fried noodles are noodles that are fried into a crispy disk and topped with a stir fry of meat and vegetables and a nice, flavorful, thick sauce. Mix the noodles, meat, vegetables and sauce at the table. The perfect bite has a bit of noodles that have soaked up the sauce, a bit of noodles that are still crunchy, and a bit of meat and vegetables. It's a fun dish to prepare and to eat! I'm also submitting this for Presto Pasta Night which is hosted by Once Upon a Feast this week. Check it out to see all the other yummy submissions.
Ingredients:
- Yellow noodles (you can find these in any Asian supermarket. You can go with thick or thin, I happened to go with thick)
- Any combination of meat (typical options are chicken, beef and shrimp)
- Cabbage
- Carrots
- Garlic
- Soy sauce
- Oyster sauce
- Water
- Corn starch
Directions:
- Cook the noodles according to the package directions, drain them and set them aside.
- Slice the meat into bite size pieces. Marinate them in a mixture of corn starch and soy sauce while you prep the other veggies.
- Slice the carrots into thin slices (I like to do it at a bias)
- Chop the cabbage into roughly 1 inch squares
- Mince the garlic
- Mix a few teaspoons of corn starch with a few teaspoons of cold water and set aside.
- Heat about at least 1/2 inch of oil in a pan (you can deep fry the noodles too if you'd like) until placing placing a chopstick into the oil makes it bubble.
- Carefully dump the noodles into the oil and fry until crispy.
- Flip the noodles and fry the other side until crispy.
- Remove the noodles, drain the oil, and set them aside. - Heat a bit of oil in another pan (or dump most of the oil out of your original pan) and add the meat, some soy sauce, and the garlic. Stir fry it until it's mostly cooked. If you're using shrimp, add the shrimp at the last minute so that it doesn't overcook.
- Add the veggies and oyster sauce. Cook through while keeping everything in the pan moving.
- When everything is done, add more water if you need to (you should have quite a bit of sauce for the noodles to soak up) and the corn starch/water slurry to thicken up the sauce.
- Spoon the meat, veggies and sauce over the noodles and serve while hot.
Friday, March 19, 2010
Garlic Steamed Scallops
 This is a dish that I had in Hong Kong and Singapore and I absolutely adored it. There are these restaurants with live seafood. You go up to the tanks, pick what you want and tell them how you want it prepared. This is a picture of the tanks at one of the restaurants on Lamma Island in Hong Kong. So fresh and delicious!
 My favorite dish to order at these types of restaurants was the garlic steamed scallops. Humongous fresh scallops, steamed with garlic and glass noodles. Yum, yum, YUM!
I'm not sure what else they put in because as I tried to recreate it, it just wasn't quite the same. If you've ever had this dish, please help me out and let me know what I'm missing. I'm dying to recreate it properly.
In the meantime, here is what I did...
Ingredients:
- Sea scallops
- Glass noodles
- Garlic
- Scallions
- Sea salt
- Oil (I used sesame, but I suggest using olive oil or butter instead)
Directions:
- Soak the glass noodles in hot water until soft. They should be pretty much cooked since they won't be steaming for long.
- Finely dice/crush the garlic.
- Lay down a bed of the noodles, then the scallop, then a generous dollop of garlic and a bit of chopped scallions.
- Sprinkle sea salt on top and drizzle a bit of oil on top. I used sesame oil, but the flavor was way too strong. I'm thinking maybe olive oil or butter would be better.
- Place it in a steamer for about 5-10 minutes or until the scallop is cooked (be careful not to over cook them).
Saturday, October 3, 2009
Chao Mi Fen
 If you're Chinese, you call this mi-fen. If you're Filipino, you call this pancit. If you're Malaysian, you call this bihon. In America, they call it Rice Vermicelli. Regardless of what you call it, I call it yummy!
This is my submission to Presto Pasta Nights, a wonderful event created by Ruth of Once Upon a Feast, which is being hosted by Joanne of Eats Well with Others. Check out the roundup at the end of the week for more noodly goodness.
- Half a bag of dried rice vermicelli
- 5 carrots
- Half a head of napa cabbage
- 2 to 3 chicken breasts or pork chops
- Soy sauce
- Oyster sauce
- Soak the rice vermicelli in water while prepping the other ingredients. It should be soft and pliable by the time you need to use it, which should take about 10 minutes or so. Soaking it longer does no harm.
- Slice the chicken or pork into thin strips of about a quarter inch thick. If you want bigger pieces of meat, that's fine too, there are no real rules to this.
- Mix in a bit of soy sauce and corn starch with the chicken/pork to marinate and tenderize it.
- Peel and shred the carrots. I find the shredding blade of the food processor especially handy for this task.
- Wash and thinly slice the napa cabbage. You can use more or less if you'd like, or use regular cabbage or even other veggies such as spinach if you'd like too. There's a lotta flexibility here. My mom used napa cabbage, so that's what I use too.
- Heat a bit of oil in a large pot or wok.
- Put the marinated meat into the pot/wok and stir it until it's about 80% cooked through. You can add more soy or oil if it seems to be sticking to the pan too much.
- Add the carrots and cabbage and give everything a good stir. Sprinkle a bit of salt on top and put the lid on. Check on it every few minutes, giving it a stir if necessary, until the carrots and cabbage have wilted and softened significantly.
- Add the soaked noodles in and flavor with soy and oyster sauce to taste. Stir everything together until the noodles are soft. If the pan keeps drying out while you're stirring or the noodles are too hard, add more water.
- I love to serve this with Sriracha sauce.
Saturday, September 19, 2009
Soba Noodles

A few months ago, my office moved less than 6 miles away from home! It still takes me about 15 minutes because it's all local, but it's still nice to be so close.
One of the benefits of being so close is that I can go home for lunch! I don't do it often, but it's nice to know it's an option.
On this particular day, I didn't bring a lunch like I usually do and didn't have lunch plans with anyone, so I decided to go home. There were no leftovers in the fridge (otherwise I would've brought those for lunch), so I needed to make something quick. We're going through a heat wave right now in California, so I decided on cold soba noodles. Quick, refreshing, healthy, and delicious!
This is my submission for Presto Pasta Nights which is being hosted by Sara of I'm a Food Blog. Check out the rest of the submissions on Sept 25th!
Ingredients:
- 1 serving of soba noodles
- Edamame (I used frozen)
- 1-2 slices of ham
- Soy sauce
- Rice vinegar (or any vinegar will do if you don'to have rice vinegar)
- Mirin (honey or sugar is fine if you don't have mirin)
- Miso paste (if you don't have this, just leave it out and put more soy)
- Wasabi paste (optional, if you want a bit of kick)
Directions:
- Boil a pot of water and cook the soba according to package directions. Put the edamame in also, just to heat them through. Immediately drain and rinse with cold water when done and set aside.
- Mix a bit of soy, vinegar, mirin, miso paste, and wasabi in a bowl to taste. If you're missing some of the ingredients, no big deal. Just substitute the soy and miso with something salty, the vinegar with something sour and/or citrusy, and the mirin with something sweet.
- Toss the noodles in the sauce and top it with the edamame and julienned ham and you've got yourself a quick and easy summer meal.
Tuesday, May 12, 2009
Niu Rou Mien (Taiwanese Beef Noodle Soup)
 Now that you have amazing handmade noodles, you need something equally amazing to eat those noodles with, right? Enter one of my all time favorites - Niu Rou Mien aka Taiwanese Beef Noodle Soup. I love this stuff. One of my coworkers makes us go to the same exact place EVERY week and orders this dish so that he can get his weekly fix, and I more than happily oblige.
Usually, this dish is served with a nice thick layer of spicy red oil on top of the broth, but alas, when I'm cooking at home, I can't bring myself to knowingly eat it that way, so I refrigerate the broth overnight and skim off the solidified fat. It's still yummy, but if you chose not to skim off the fat, it'll only make it better.
Additionally, making a batch of Niu Rou Mien is the perfect opportunity to impart some of these great flavors into a few other otherwise ingredients. Personally, I really like the flavor of carrots that have been stewed in the broth, so I always toss a few of those in. I adore soy sauce eggs and this broth is perfect for making them, so I always make sure to cook up a batch of those too whenever I'm making this dish. Other things typical items that you can toss in there are dou gan (bean curd - kinda like a super firm tofu) and seaweed.

I'm submitting this post to Pasta Presto Nights. Patsy of Family Friends & Food is hosting this week, so check out her blog on May 15th to see everyone else's pasta creations!
Now onto the second most important part - how to make this dish. (The most important part is actually eating it)
Ingredients:
- Handmade noodles (recipe here)
- Beef (traditionally beef shank, but any stew meat will do. I used chuck this time)
- Beef Tendon (totally optional. some people like it, some don't)
- Water or Beef or Chicken or Vegetable Stock
- Soy sauce (to taste)
- Brown sugar (to taste)
- 1-2 sprigs of Green onions
- 3-4 cloves of Garlic
- 3-5 slices of Ginger
- 3-5 Star anise
- Dried chili peppers (to taste)
- Sichuan peppercorns (to taste)
Optional additions that I used:
- Carrots
- Peeled hard-boiled eggs
Directions:
- Put the meat, tendon and carrots if you're using them, ginger, garlic, scallions, spices, etc (basically everything but the eggs) in a pressure cooker or heavy bottomed pot. If you're not using a pressure cooker, go ahead and stick the eggs too. If you are, I don't imagine pressure cooked eggs to be a pretty sight (though I've never tried it), so leave those out for now.
- Fill the pot with the liquid of your choice until the meat is barely covered.
- Add soy sauce and brown sugar to taste. You can always water down the broth later if you add too much, or add more if it's too bland.
- Bring everything to a boil. If you're using a pressure cooker, let it cook at maximum pressure for about 20-30 minutes and let the pressure come down naturally, or until the meat is fall apart tender. If you're using a pot, either simmer it on the stovetop or put it into a 350 degree oven for a few hours until the meat is fall apart tender.
- Take out everything but the spices, ginger, scallion and garlic and set it aside.
- Strain the broth. If you used a pressure cooker and want to make soy sauce eggs, put the eggs in and let it simmer for at least an hour (the longer the better though) so that the color and flavor penetrates the egg.
- If you want, refrigerate the broth overnight to remove the layer of fat on top.
- Now it's time to serve! In a bowl, put some noodles, a bit of the broth (and some water if it's too salty), and a few slices of the beef. Garnish it with some bok choy, carrots, soy sauce egg, pickled cabbage, green onions, parsley, etc.
- Slurp and enjoy!
Monday, May 11, 2009
Homemade Noodles
 I love nice thick chewy noodles and the texture that can only come from fresh noodles, not dried. Since it's sometimes hard to find them at stores, I decided to make them myself. The only problem is that even though it's easy, it makes a big mess, so if I'm going to the trouble of making them, I like to make extra and freeze them. I floured them heavily and froze them in individually sized portions. Unfortunately, they stuck together even though I dusted them with a ton of flour. If you have a suggestion on on how store/freeze them, please let me know!
Ingredients:
- 2 parts Flour
- 1 part Ice Water
- lots of extra Flour to keep things from sticking
Directions:
- Mix the water and flour together and knead until it forms a nice smooth dough, adding more flour as needed for dusting the work surface and your hands.
- Let the dough rest for at least 10 minutes.
- Roll the dough out into sheets about 1/8 of an inch thick. If you're having trouble rolling it out, let it rest longer.
- Flour the sheet heavily and roll it loosely.
- Cut the rolls into strips of your desired thickness. Personally, I like them about half an inch wide. - Carefully unroll the cut strips and lay them out, heavily floured so that they don't stick.
- Bring a large pot of water to a boil.
- Put the noodles into the water for just a few minutes until the noodles are cooked through.
- Drain the noodles and put them into the broth of your choice or toss them with olive oil or sesame oil for use at a later time.
Thursday, May 29, 2008
Pad Thai

Pad thai is a HUGE contributor to my freshman 30. Yes, I said freshman 30, not 15. I'd go to the cafeteria, pick at some french fries or something else unhealthy but edible. Then I'd get hungry again around midnite because I didn't eat a real dinner, and I'd walk down the street to the food court and get pad thai. Sooo worth it! =)
Now, you may ask why my pad thai so pasty white instead of that gorgeous orange color like the ones you get at restaurants? To be honest, I'm not really sure. This was my first time making pad thai and my best guess is that I didn't use enough tamarind. I didn't measure out any of my seasonings and just did it to taste, and to be honest, mine was a bit bland and I definitely could have used a bit more flavor. I'll be less stingy next time with the tamarind (and other flavorings) and see if it makes a difference.
Here's my recipe, though I recommend following Chez Pim or Thai Table's recipes since they have measurements.
Ingredients:
- Rice noodles/sticks
- Garlic (minced)
- Green onions
- Bean sprouts
- Chicken
- Shrimp
- Egg
- Tofu (extra firm)
- Pickled turnip (optional)
Sauce:
- Tamarind paste
- Palm sugar or brown sugar
- Fish sauce
Garnish:
- More bean sprouts
- Ground peanuts
- Chili flakes
- Lime (lemon in my case)
Method:
First soak the rice noodles in hot water for about 10 minutes or until they're pliable. You don't want them to be cooked, just soft enough to work with.
Slice your chicken into bite-size pieces. I always like to coat them with corn starch and soy at this point. The soy for flavor and the corn starch will help keep the chicken tender and prevent it from being overcooked. I'm lazy and don't like to stir fry ingredients one at a time - cook the meat, set aside, cook the veggies, set aside, cook ..., set aside, then mix all together. Instead, I like to put in the meat, put in the veggies on top of it, from slowest cooking to fastest cooking, so it makes a huge difference for me, but it's definitely optional.
 Prep your other ingredients: Slice the tofu into small cubes. Slice the green onions into ~1 inch strips, or at a diagonal slant. Peel and devein your shrimp. Wash your bean sprouts. Mince your garlic.
Some people like to premake their sauce and dump it in, so you can do that at this time also.
Heat up your wok until almost smoking. Add oil and swish it around until it's coated and heated through.
Add the chicken and stir it until mostly cooked. Add garlic, tofu, green onions, and pickled turnip. Toss around a bit.
Add the noodles, bean sprouts, and the sauce. Keep everything moving until the noodles are cooked through. If you find your wok is dry and the noodles are still too hard, add more sauce or some water.
When the noodles are ready to go, push everything aside and crack an egg in the middle of the wok. Scramble it. After it's cooked, fold it into the noodles.
Add the shrimp and toss until it's cooked.
Serve with garnishes of your choice.
Wednesday, May 21, 2008
Japanese Cold Noodles

There was a heat wave coming through, so I thought it'd be nice to make some cold noodles. Japanese cold noodles are quick, easy and perfect for a nice hot day.
The picture is a bit fuzzy and the presentation is definitely lacking, but the flavor is definitely there. Things I would do differently next time though is cut the egg thinner and use non deli ham and and cut it thinner as well.
Ingredients:
- instant noodles
- eggs
- ham
- cucumber
- bean sprouts (I didn't have any on hand so I just used extra cucumbers)
- sesame or furikake (optional)
Dressing:
- soy sauce
- vinegar
- sesame oil
- grated ginger
- wasabi
Method:
- Cook the instant noodles without the flavoring packets and then run it through cold water. Toss it with a bit of sesame oil to keep it from sticking together (this part is optional). Set aside.
- Beat the eggs and spread it in a thin layer in an oiled non-stick skillet. Cook until the edges are firm, then flip to cook both sides. Julienne the egg "pancake" and set aside.
- Julienne the cucumber.
- Julienne the ham.
- Mix the dressing ingredients in a bowl to taste.
- Put eggs, cucumber, ham and bean sprouts over the noodles. Pour the sauce over the noodles. Sprinkle with sesame seeds or furikake.
- Mix all ingredients and enjoy!
Monday, May 5, 2008
Dan Dan Noodles

aka dan dan mien.
I was cranky and stressed out the other day, and had a craving for something carby but quick since I was tired and not really in the mood to cook. You've heard of 30 minute meals right? This took me about 10! And what's even better is that you can make this dish entirely with the microwave if you want!
Ingredients:
*makes enough sauce for about 2 servings, depending on how much sauce you like on your noodles
- 2 tablespoons of sesame paste or peanut butter (I used chunky peanut butter but sesame paste would be best)
- 3/4 cup water or chicken stock
- 1 clove finely minced garlic
- some grated ginger
- soy sauce to taste
- vinegar to taste (preferably rice wine, but any will do)
- chili oil (optional)
- chili flakes or chinese style hot sauce (optional)
- 1 scallion sliced thinly (optional)
- chinese pickled turnips/radishes (optional)
- ground pork, chicken or turkey (optional)
Method:
*I'll explain the microwave method, but keep in mind you can do all this on the stovetop as well.
- Put the sesame paste/peanut butter, water/chicken stock, and garlic in a bowl and microwave for 1 minute.
- Mix until the sesame paste/peanut butter is melted and a smooth consistency (no need for a whisk: the fork or chopsticks you plan on eating with will do just fine). If you like your dan dan noodle sauce to be more watery, add more water/chicken stock. I've had it restaurants where it was almost like a soup, and other places where there was no liquid at all, so it's really up to you and your preferences. If it gets too watery, toss it back into the microwave to help some of the water evaporate and make the sauce thicker. Keep in mind that it will probably thicken a bit as it cools but will also become more watery as you add in the soy and vinegar. 
- Add soy sauce, vinegar, chili oil, chili sauce/chili flakes to taste. If adding the seasoning liquid makes your sauce too watery, go ahead and toss in the microwave as explained above.
- Add in scallion (or you can save this to add at the end as garnish, or both)
- Add pickled turnips/radishes (I like the crunch and saltiness it adds to the dish but is optional)
- Add cooked ground meat if desired (I believe traditionally, dan dan mien has no meat, but whatever)
- Pour the sauce over noodles (you can microwave some instant ramen noodles to really stick to the microwave theme).
- Enjoy all your 10 minutes of hard work!
Friday, April 11, 2008
cheater's pho
 After weeks of gorgeous summer-like weather, it rained today!* Grrr. Cold, gloomy, it puts me in the mood for a nice, hot soup, so I made some pho (the cheater's version).
This recipe is faaaar from authentic but it's still tastes good and it's MUCH faster, so I'm calling it "cheater's pho". Authentic pho takes hours of simmering beef bones and spices and then ideally refrigerating overnight to make fat removal easier.
I usually don't like to go out to by stuff for one particular dish, so my garnishes aren't traditional either, but they are what I had in the fridge/pantry already. Typically, your garnishes should include thinly sliced onions, bean sprouts, mint, lime, cilantro, and thinly sliced rare beef (or meatballs or beef tendon, etc).
*Note: I started this post a while ago and now the weather is back to being sunny and gorgeous. Yay!
Ingredients: Soup -
- 1 can of beef broth (or chicken broth if you want to make pho ga - chicken pho)
- 1/2 onion quartered (and a few thin slices set aside to add into the noodles)
- 1 star anise
- 5-10 thin slices of ginger
- a pinch of cinnamon
- 5-10 coriander seeds
Noodles -
- 1.5 cups of thick, flat rice stick noodles
Garnish -
- 4 slices of roast beef (because it was the closest thing I had to rare steak in the house)
- a handful of spinach (becuase I had none of the proper veggies)
- 2 thin slices of onion
Directions:
- Boil all the broth ingredients for ~10 minutes to extract all the flavors. The longer the better, but at least 10 minutes.
- Boil the noodles according to the package directions.
- Strain the broth.
- Put everything in a bowl - broth, noodles, garnishes into a bowl and slurp it up!
Friday, March 7, 2008
Ants crawling up a tree
Yes, that's the literal translation of this Chinese dish. The noodles are trees and the bits of meat are the ants! It was always one of my favorites growing up because it had a silly name and it tasted good!
Anyway, this is a super easy dish to make that I did because I soaked extra bean thread noodles and defrosted extra ground turkey from the eggrolls I made the other day.
You can use any ground meat, I personally prefer pork, turkey or chicken and tend to stay away from beef, although that could work too. You can also add all sorts of veggies/garnishes if you want, along with other seasonings to make variations of it. I made the simplest version below:
Ingredients:
- 1 packet of mung bean thread noodles soaked in water until softened (20 mins)
- 3 oz of ground pork, turkey or chicken
- 1 Tbsp oil
- 2 Tbsp soy sauce (this should actually be to taste and is an estimation)
- water as needed (~1/4 - 1/2 cup)
Optional additions/garnishes:
- scallions
- sesame
- peas
- shredded napa cabbage and/or carrots
- minced garlic
- sugar
- whatever you feel like tossing in
- Sacha sauce (replace half of the soy sauce with this to give it a bit of heat and a unique flavor)
Directions:
- Heat up the wok until it's very hot and then add the oil
- Add the ground meat and half of the soy sauce and use a spatula to cook and break up the meat until mostly cooked
- Put in the noodles, the rest of the soy sauce, and a bit of water
- Toss/Mix the noodles and meat until the the water is absorbed by the noodles. If more water is needed to fully cook the noodles, add it as needed.
Easy peasy!


 Posts
Posts


